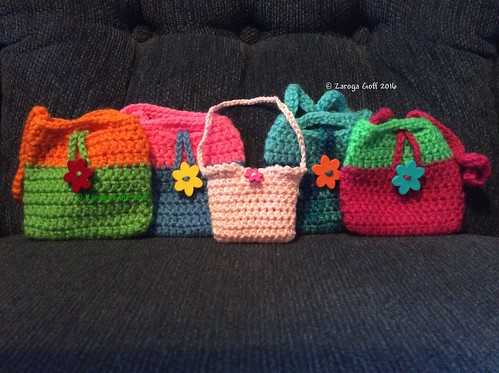


I have been crocheting a lot the past few years to occupy my time and mind... to keep from going t-totally insane. I have had a long journey to get through a bad spot of health and still have much healing to do. It is not easy on my arthritic and tendonitis hands... but I get through with hand stretches and breaks.
I don't go out these days by myself and it is usually a trip to a doctor's office. I am not much on big handbags/purses/pocketbooks. I wanted something to just hold my essentials (eyeglasses, phone, keys, ID and inhaler and sometimes my wallet which is a small one).
Since I have a need to crochet... as in I will go t-totally insane if I don't... I decided to make up my own pattern. A much as I looked at bags none suited my need or I had no idea what they were talking about. I am hoping I wrote it down correctly.
You are welcome to use the pattern, but please do not copy and paste the pattern into your blog or web page. You can make items to sell with the pattern, but not sell the pattern. Please link back to this post.
Forgive the awful photography. Since surgery I cannot lift my camera to eye level and hold long enough to compose and snap. These photos are taken with my ipad... so just existing lighting.
You can either copy and paste the pattern into your word program or email me at fourof5zs@yahoo.com . Another option is to add a Print Friendly Button to your browser. I am sorry. The way my blog is configured does not support me directly putting it in my blog.
Since I wrote the pattern after the fact there may be mistakes in the pattern. Please let me know if you find one.

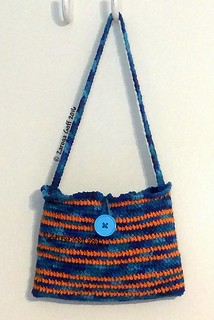
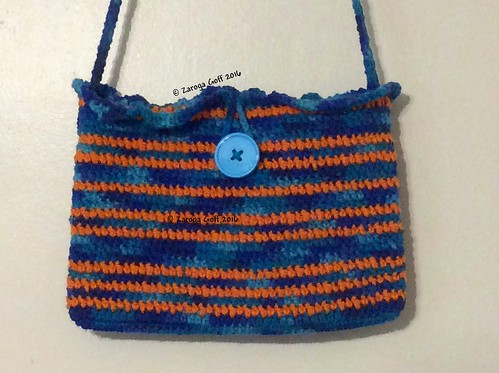
ZEE GEE’S ESSENTIALS BAG
After washing my bag from hdc to hdc round.. top to bottom
is about 7 inches and side to side is about 7 ¼ inches..
YARN: Worsted
Weight 4 (I used as pictured) I Love
Cotton in Color A: Deep Turquoise and
Color B: Fiesta Print. An acrylic yarn would work well too.
Hook: G
MARKERS: I
suggest you mark beginning of round and end.
That way you do not accidently stitch in ch 1. You will need to mark a few stitches in the base of bag to mark
increases. You will mark center front and back of back and center sides.
BUTTON: (whatever
size you wish)
PLASTIC CANVAS: A
small piece cut to fit bottom base of bag. Quilt batting might work.
If you do not want any extra stiffness, just skip that part and do not
fasten off. I washed and dried my bag on perma-press and the canvas did fine.
GUAGE: Too big a hook and there will be too much space between
stitches. I would suggest making a swatch of some chains, a row of single
crochet and then a few rows of the single crochet alternate double crochet pattern to
see how it looks. Approximately 1”x1” square = 5 stitches of sc, dc pattern and
4 rounds. Base rounds = approximately 1’ across and 7 ¼ inches long. (these are
my after wash measurements because I forgot to measure pre-wash)
TERMS :
ch = chain
sc = single crochet
dc = double crochet
ss = slip stitch
CA = Color A
CB = Color B
ch = chain
sc = single crochet
dc = double crochet
ss = slip stitch
CA = Color A
CB = Color B
BODY OF BAG:Working in the round; no turning.
ch 1 does not count as a stitch
ch 1 does not count as a stitch
Chain 26 CA
rd 1: in
back humps of chain: 2 sc in second chain from hook (mark 1 rst sc) . 1 sc
in each chain to end; 2 sc (place marker to mark sts for next rd) in last
chain (27 sts) In same chain working on opposite side of chain sc;1 sc in each chain to end; 2 sc (mark sts for next rd) in last chain; join
with ss in first sc (27 sts) (total round 54)
rd 2: ch
1; 2 sc in next 2 sc; sc until marker; 2 sc in next 2 sc ( mark the last sc of
series for next rd); 2 sc in each of next 2 sc ( mark the first sc of series
for next rd); sc to in each st to next marked sc; 2 sc in next 2 sts ( mark
last sc of series for next rd); join with ss in first sc (31 sts each side; 62
total)
rd 3: ch 1; 2
sc in first sc; sc in each sc until marker; 2 sc in each of next 2 marked sc; 1 sc
in each stitch until next marker; 2 sc in marked stitch; join with ss in
first sc (33 sts each side; 66 total)
If using plastic canvas fasten off and continue on with
this. If not using plastic canvas go to
rd 4.
Cut plastic canvas to fit between 2 layers (the plastic canvas I used was very thin so I used 2 pieces) (place one section on plastic canvas and trace with maker. cut plastic canvas a smaller than lines.. allowing room to crochet together) . This gives a little extra support for bottom of bag.
Cut plastic canvas to fit between 2 layers (the plastic canvas I used was very thin so I used 2 pieces) (place one section on plastic canvas and trace with maker. cut plastic canvas a smaller than lines.. allowing room to crochet together) . This gives a little extra support for bottom of bag.
repeat rds 1-3 DO NOT FASTEN OFF
Pin the two pieces together and either ss or sc together matching stitches, inserting canvas when a little more than half way. DO NOT FASTEN OFF
Pin the two pieces together and either ss or sc together matching stitches, inserting canvas when a little more than half way. DO NOT FASTEN OFF
rd 4: ch 1; hdc
in each sc around; join with ss in first sc. (66 sts total)
Beginning With CB
ALTERNATE COLORS FOR EACH ROUND STARTING HERE
rd 5-30: ch 1; (1
sc in next st, 1 dc in next st) around. join with ss in first sc. (66)
you should end with CA
you should end with CA
rd 31: WITH CA : ch 1; hdc around; join with
ss in first sc. (66)
MARK CENTER FRONT AND CENTER BACK OF BAG
EITHER MARK WHERE YOU WANT YOUR
BUTTON OR GO AHEAD AND SEW IT ON. I MARKED MINE WITH A LOCKING MARKER. IT
WILL GO TO YOUR LEFT OF WHERE YOUR HOOK IS AT THIS POINT IN CENTER OF BAG
(if you crochet right-handed) I SEWED THE BUTTON ON AT ROUND 26. PLACE ON WHICHEVER
ROW LOOKS BEST TO YOU. THE BUTTON I USED
HAD TWO HOLES. I THREADED AN UPHOLSTERY NEEDLE THAT FIT THROUGH BUTTON
HOLES WITH CA YARN. I TIED MY YARN BEHIND WITH A COUPLE OF KNOTS AND
WEAVED THE ENDS IN FOR EXTRA SECURITY.
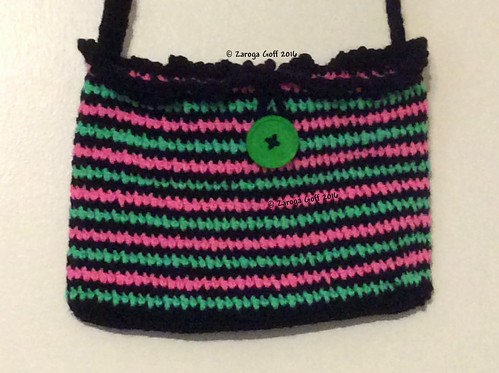
rd 32: (THIS
ROUND WILL CREATE A SLIGHT RUFFLE.. IF YOU DO NOT WANT A RUFFLE JUST SC AROUND UNTIL YOU GET TO PLACES YOU SS AND CHAIN BUTTON LOOP) ch 1; sc in next stitch; ch 2; sc in next stitch until two 2
stitches before marker, ss in these 2 stitches, the stitch of the marker and
the following 2 stiches (5 ss in all); continue sc in next st, ch 2 until next marker;
ss in marker st and ch ever how many you need for your button loop.. I did 20
(it depends on where you placed your button and how big the button is to how
many chains you need); join in same stitch. continue around with sc in next
stitch; ch 2; sc in next stitch; join with ss. Fasten off.
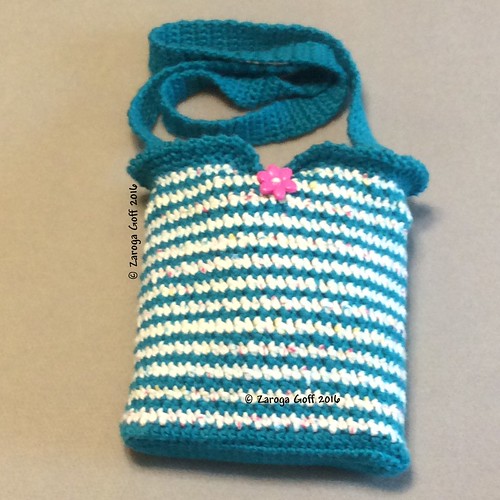
STRAP:I chained 6 leaving a long tail for
sewing and sc (in back humps of ch) in second ch from hook and across.
(5). repeat ch1, sc in each sc, turn as many times as needed. I think my
strap is about 45" long. (I suggest before fastening off that you
pin strap in place with safety pins to choose how long you need the
strap) I left a long tail for sewing. Mark your center sides and
sew straps in place. You can choose other ways to make your strap.
I think next time instead of sc I will try hdc. I think it would be just as
strong and less painful for my hands.
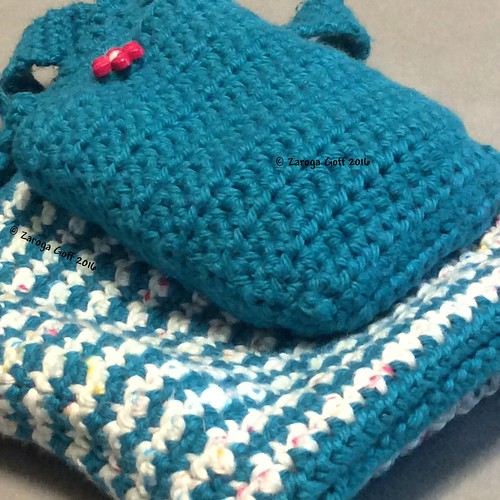
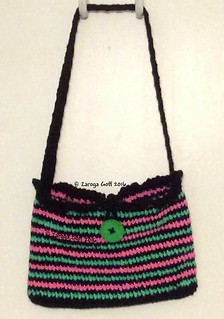
The above photo shows my bag inside out. I made a little pocket to hold my ID, keys and inhaler. I did not write down how I did it. Basically I played with chaining until I came up with one a few chains wider... about 6 I think... than my ID case with my keys stacked on top. I did several rows of hdc and fastened off. To make the bottom part I attached my yarn 2 stitches (I think) in from the side (leaving a tail long enough to sew the corner together) and hdc across until 2 stitches before end of row and turned and did another row of hdc. I fastened off leaving a long tail. I used a yarn needle and sewed the edge where I attached the yarn for the two rows of hdc and sewed ends in and then I thread the long yarn tail on other side and sewed corner together. Then I figured out where I wanted to place the pocket. I wanted the bottom along a row of the CA so the yarn would not show up drastically on outer side. of bag. I pinned the right-side of bottom to wrong wide of bag and pulled my yarn between and over the stitches of the bag and then through the top loops of the pocket. I then flipped the pocket to right-side facing me. I lined up where the pocket sides should go and I made a line with a sharpie fine marker so I could keep my sewing straight. I continued with my long yarn sewing the left side to bag. I wove the tail in well. I took another piece of yarn in my needle and attached to the lower right side and sewed that side up and wove in my end. I sewed with a upholstery needle the button in between the first and second rows at top of pouch. I took my yarn and hook and crocheted a chain of 10 and ss to beginning chain. I cut the yarn leaving tail long enough to attach to bag.. the CA stripe below the first CB stripe from top. Yours may differ depending on your placement and size of pocket.