Wednesday, April 6, 2016

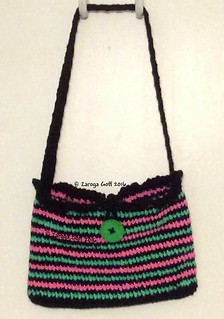
Zee Gee's Essentials Bag

My two oldest grand-darlings came into our family with their mother's marriage to my son and each has a different father.  As you can imagine all the common reference to a grandmother were taken. I thought perhaps they might be more comfortable just calling me by my initials Z G.  Written out either ZeeGee or Zee Gee.  They loved it... and so do I! The other two call me Zee Gee too.

I have been crocheting a lot the past few years to occupy my time and mind... to keep from going t-totally insane.  I have had a long journey to get through a bad spot of health and still have much healing to do. It is not easy on my arthritic and tendonitis hands... but I get through with hand stretches and breaks.

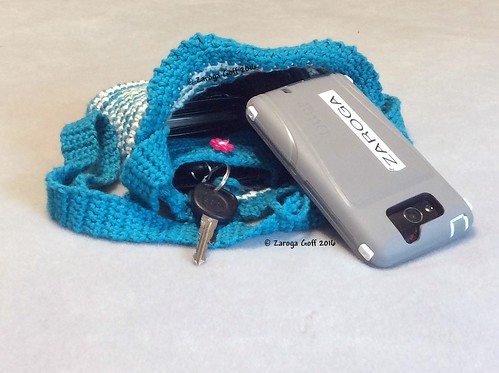
I don't go out these days by myself and it is usually a trip to a doctor's office.  I am not much on big handbags/purses/pocketbooks.  I wanted something to just hold my essentials (eyeglasses, phone, keys, ID and inhaler and sometimes my wallet which is a small one). 

Since I have a need to crochet... as in I will go t-totally insane if I don't... I decided to make up my own pattern. A much as I looked at bags none suited my need or I had no idea what they were talking about.  I am hoping I wrote it down correctly. 

You are welcome to use the pattern, but please do not copy and paste the pattern into your blog or web page. You can make items to sell with the pattern, but not sell the pattern.  Please link back to this post.

Forgive the awful photography.  Since surgery I cannot lift my camera to eye level and hold long enough to compose and snap.  These photos are taken with my ipad... so just existing lighting.

You can either copy and paste the pattern into your word program or email me at fourof5zs@yahoo.com .  Another option is to add a Print Friendly Button to your browser. I am sorry.  The way my blog is configured does not support me directly putting it in my blog. 

Since I wrote the pattern after the fact there may be mistakes in the pattern.  Please let me know if you find one.
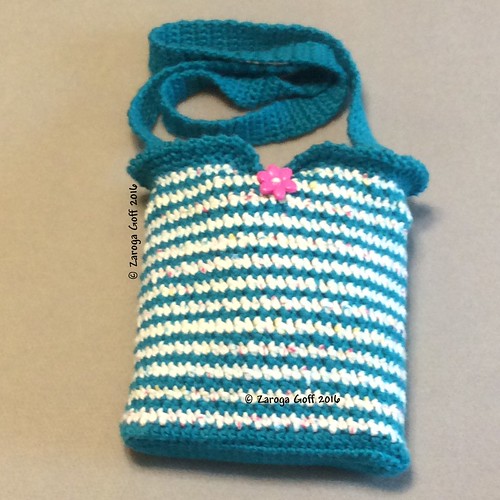

Zee Gee Essentials Bag


Zee Gee Essentials Bag


ZEE GEE’S ESSENTIALS BAG
 

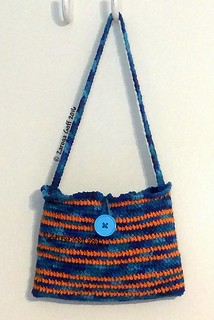
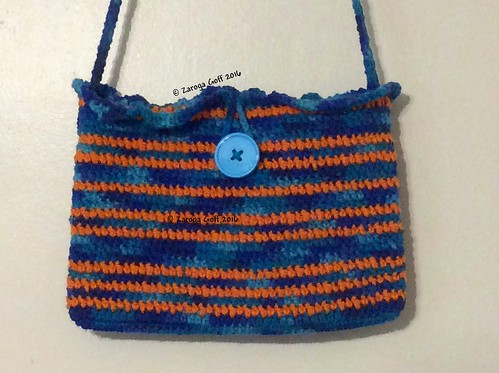
After washing my bag from hdc to hdc round.. top to bottom is about 7 inches and side to side is about 7 ¼ inches..
YARN: Worsted Weight 4 (I used as pictured) I Love Cotton in  Color A: Deep Turquoise and Color B: Fiesta Print.  An acrylic yarn would work well too.
Hook: G
MARKERS: I suggest you mark beginning of round and end.  That way you do not accidently stitch in ch 1. You will need to mark a few stitches in the base of bag to mark increases. You will mark center front and back of back and center sides.
BUTTON: (whatever size you wish)
PLASTIC CANVAS: A small piece cut to fit bottom base of bag. Quilt batting might work. If you do not want any extra stiffness, just skip that part and do not fasten off.  I washed and dried my bag on perma-press and the canvas did fine.
GUAGE:  Too big a hook and there will be too much space between stitches. I would suggest making a swatch of some chains, a row of single crochet and then a few rows of the single crochet alternate double crochet pattern to see how it looks. Approximately 1”x1” square = 5 stitches of sc, dc pattern and 4 rounds. Base rounds = approximately 1’ across and 7 ¼ inches long. (these are my after wash measurements because I forgot to measure pre-wash)
TERMS :
ch = chain
sc = single crochet
dc = double crochet
ss = slip stitch
CA = Color A
CB = Color B
BODY OF BAG:Working in the round; no turning.
ch 1 does not count as a stitch
Chain 26 CA

rd 1:  in back humps of chain: 2 sc  in second chain from hook (mark 1 rst sc) .  1 sc in each chain to end; 2 sc (place marker to mark sts for next rd)  in last chain (27 sts)  In same chain working on opposite side of chain   sc;1 sc in each chain to end; 2 sc (mark sts for next rd) in last chain; join with ss in first sc (27 sts) (total round 54) 
rd 2:  ch 1; 2 sc in next 2 sc; sc until marker; 2 sc in next 2 sc ( mark the last sc of series for next rd); 2 sc in each of next 2 sc ( mark the first sc of series for next rd); sc to in each st to next marked sc; 2 sc in next 2 sts ( mark last sc of series for next rd); join with ss in first sc (31 sts each side; 62 total) 
rd 3: ch 1; 2 sc in first sc; sc in each sc until marker; 2 sc in each of next 2 marked sc; 1 sc in each stitch until next marker; 2 sc in marked stitch;  join with ss in first sc (33 sts each side; 66 total)  
If using plastic canvas fasten off and continue on with this.  If not using plastic canvas go to rd 4.

Cut plastic canvas to fit between 2 layers (the plastic canvas I used was very thin so I used 2 pieces) (place one section on plastic canvas and trace with maker.  cut plastic canvas a smaller than lines.. allowing room to crochet together) .  This gives a little extra support for bottom of bag. 
repeat rds 1-3 DO NOT FASTEN OFF
Pin the two pieces together and either ss or sc together matching stitches, inserting canvas when a little more than half way.  DO NOT FASTEN OFF
rd 4: ch 1; hdc in each sc around; join with ss in first sc.  (66 sts total) 
Beginning With CB
ALTERNATE COLORS FOR EACH ROUND STARTING HERE
rd 5-30: ch 1; (1 sc in next st, 1 dc in next st) around.  join with ss in first sc. (66)
you should end with CA
rd 31: WITH CA : ch 1; hdc around; join with ss in first sc. (66)
MARK CENTER FRONT AND CENTER BACK OF BAG 
EITHER MARK WHERE YOU WANT YOUR BUTTON OR GO AHEAD AND SEW IT ON.  I MARKED MINE WITH A LOCKING MARKER. IT WILL GO TO YOUR LEFT OF WHERE YOUR HOOK IS AT THIS POINT  IN CENTER OF BAG (if you crochet right-handed) I SEWED THE BUTTON ON AT ROUND 26. PLACE ON WHICHEVER ROW LOOKS BEST TO YOU. THE BUTTON I USED HAD TWO HOLES.  I THREADED AN UPHOLSTERY NEEDLE THAT FIT THROUGH BUTTON HOLES WITH CA YARN.   I TIED MY YARN BEHIND WITH A COUPLE OF KNOTS AND WEAVED THE ENDS IN FOR EXTRA SECURITY.  
rd 32: (THIS ROUND WILL CREATE A SLIGHT RUFFLE.. IF YOU DO NOT WANT A RUFFLE JUST SC AROUND UNTIL YOU GET TO PLACES YOU SS AND CHAIN BUTTON LOOP) ch 1; sc in next stitch; ch 2; sc in next stitch until two 2 stitches before marker, ss in these 2 stitches, the stitch of the marker and the following 2 stiches (5 ss in all); continue sc in next st, ch 2 until next marker; ss in marker st and ch ever how many you need for your button loop.. I did 20 (it depends on where you placed your button and how big the button is to how many chains you need); join in same stitch. continue around with sc in next stitch; ch 2; sc in next stitch; join with ss.  Fasten off. 
STRAP:I chained 6 leaving a long tail for sewing and sc (in back humps of ch) in second ch from hook and across. (5).  repeat ch1, sc in each sc, turn as many times as needed. I think my strap is about 45" long.  (I suggest before fastening off that you pin strap in place with safety pins to choose how long you need the strap)  I left a long tail for sewing.  Mark your center sides and sew straps in place.  You can choose other ways to make your strap.  I think next time instead of sc I will try hdc. I think it would be just as strong and less painful for my hands.  
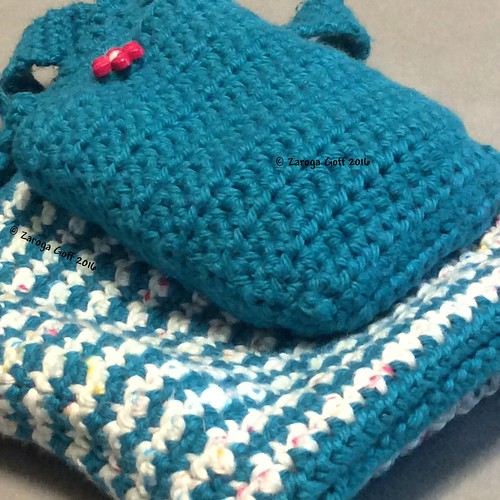
Zee Gee Essentials Bag

 The above photo shows my bag inside out. I made a little pocket to hold my ID, keys and inhaler. I did not write down how I did it.  Basically I played with chaining until I came up with one a few chains wider... about 6 I think... than my ID case with my keys stacked on top. I did several rows of hdc and fastened off.  To make the bottom part I attached my yarn 2 stitches (I think) in from the side (leaving a tail long enough to sew the corner together) and hdc across until 2 stitches before end of row and turned and did another row of hdc.  I fastened off leaving a long tail.  I used a yarn needle and sewed the edge where I attached the yarn for the two rows of hdc and sewed ends in and then  I  thread the long yarn tail on other side and sewed corner together.  Then I figured out where I wanted to place the pocket.  I wanted the bottom along a row of the CA so the yarn would not show up drastically on outer side. of bag.  I pinned the right-side of bottom to wrong wide of bag and pulled my yarn between and over the stitches of the bag and then through the top loops of the pocket. I then flipped the pocket to right-side facing me.  I lined up where the pocket sides should go and I made a line with a sharpie fine marker so I could keep my sewing straight.  I continued with my long yarn sewing the left side to bag.  I wove the tail in well.  I took another piece of yarn in my needle and attached to the lower right side and sewed that side up and wove in my end. I sewed with a upholstery needle the button in between the first and second rows at top of pouch.  I took my yarn and hook and crocheted a chain of 10 and ss to beginning chain. I cut the yarn leaving tail long enough to attach to bag.. the CA stripe below the first CB stripe from top.  Yours may differ depending on your placement and size of pocket.

blogsig

Monday, April 4, 2016

It's In The Bag

Ahh... crocheting.  I have been doing a lot of crocheting since dealing with all the stomach stuff. (read the post two posts ago to catch up what happened) It is going to be a very long recovery.  I started seeing a pain specialist a few weeks ago.  Boy do I wish I had started sooner!  It seemed like the pain was staying the same level and nothing getting better.  I had an injection in my sternum to treat sternalis syndrome three weeks ago.  I have had a lot of chest pain since surgery.  I have been assured by many doctors it is not a heart problem.  The chest pain has subsided a good bit since the injection. I still have a lot of pain.  The pain specialist doctor says I have many trigger points.  I will see the him this week and see what is next in the plan.

Forgive the awful photography.  Since surgery I cannot lift my camera to eye level and hold long enough to compose and snap.  These photos are taken with my ipad... so just existing lighting.

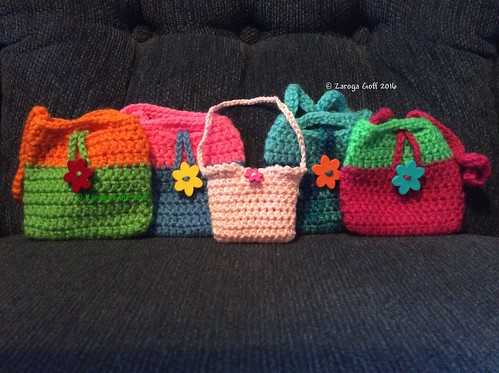
My latest projects have been bags/purses.  These Little Girl Mini Purses (just click on the link to go to pattern) were fun to make.


small purses

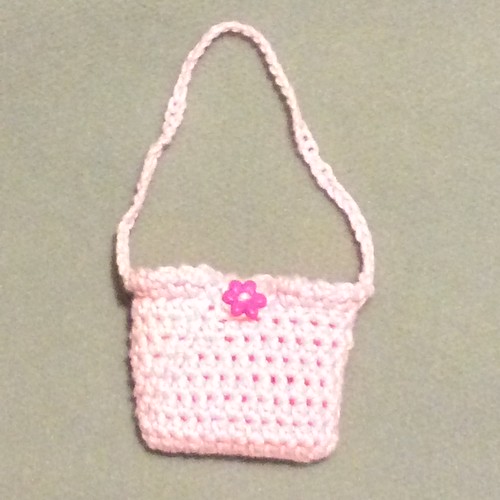
The little pink bag in the photo is one I made for grand-darling Mary's American Doll.

A closer look at it.  Hard to photograph with that sparkle in it.

Untitled

You are welcome to use the pattern, but please do not copy and paste the pattern into your blog or web page. You can make items to sell with the pattern, but not sell the pattern.  Please link back to this post.

You can either copy and paste the pattern into your word program or email me at fourof5zs@yahoo.com . Another option is to add a Print Friendly Button to your browser. I am sorry.  The way my blog is configured does not support me directly putting it in my blog.

HANDBAG FOR AMERICAN GIRL DOLL
Pattern Design by Zaroga Goff

YARN: Pink Sparkle, I Love This Cotton
Hook: G
Very small button
Markers

Chain 13

R-1: (crochet in back bump of chain) hdc in 3rd chain from hook and in each stitch with two hdc in last st. turn and 2 hdc in other side of stitch.  continue hdc down row, 2 hdc in last stitch. ss to top of beg chain. 26 hdc

R-2: ch 1 hdc in same stitch as ss.  hdc around, join with ss in top of hdc.

R-3--10: repeat r-2

Mark sides, center front and center back

R-11: ss to center side, sc ch 2 around to center of back, ch 10, ss in same stitch.  continue around with sc ch 2. ss in beginning sc. Do not fasten off

Strap: ch 50 and ss to other side.  weave in ends and sew button on center front.

I also made these two bags for my other two grand-darlings, Carly and Jaime.


Grand-Darling Purse        Grand-Darling Purse


Grand-Darling Purse
 
Grand-Darling Purse

You are welcome to use the pattern, but please do not copy and paste the pattern into your blog or web page. You can make items to sell with the pattern, but not sell the pattern.  Please link back to this post

You can either copy and paste the pattern into your word program or email me at fourof5zs@yahoo.com .  Another option is to add a Print Friendly Button to your browser. I am sorry.  The way my blog is configured does not support me directly putting it in my blog.

There may be mistakes in the pattern; that can happen when you write it down after the fact.  Please let me know if there is a mistake or if you have a question about the pattern.  fourof5zs@yahoo.com
 
GRAND-DARLING PURSE
Pattern Design by Zaroga Goff
 
My purse pre-washed is approximately 11 and a half inches wide and 8 inches tall flatten (which includes base of purse).
 
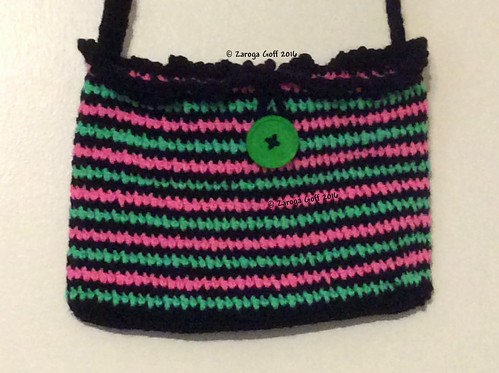
Yarn: Worsted Weight 4.  I used Red Heart Super Saver scraps. First bag: Macaw and Pumpkin. Second bag: Black, Shocking Pink, Spring Green  If using more than 3 colors I suggest fastening off each color.  With two or three colors the yarn can be carried up the side.  Change colors at the ss join.  I think in one color maybe a skein this size purse.

Hook: H.  I did not measure my gauge.  Make you swatch using different hooks and the sc, dc alternating stitch and see which look you like best.  My stitches are close to what they say on the wrapper.

Markers: Mark first stitch of round and stitches specified.  I also mark my last stitch of round so I do not put a stich in a chain 1

DO NOT TURN WORK     EXCEPT in STRAP
Chain: 40

rd 1: (working in back hump of chain) 2 sc second chain from hook and sc each chain; in last chain 2 sc (mark the first stitch for next rd); working in opposite side of chain: 2 sc in same chain as last 2 sc; sc across in top v of stitches, 2 sc in last stitch (mark the first stitch for next rd); join with ss to beg sc. (41 stitches each side; 82 stitches in round)

rd  2: 2 sc in next 2 stitches; sc each stitch until last 2 two stitches on that side (starting with stitch you marked) 2sc in next two sc; continuing on next side, 2sc in next 2 stitches; sc in each stitch until you reach your marker, 2 sc in next 2 sc; join with ss. (45 stitches each side; 90 total for rd)

rd 3:  ch 1 hdc in same stitch as ss: hdc in each stitch around; join with ss (90) 

rd 4:
ch 1; sc in same stitch as ss, dc in next stitch; sc, dc around. join with ss
Repeat rd 4 (you sc in sc stitches and dc in dc stitches) until desired height.  DO NOT FASTEN OFF

Marking center front for button and sewing button:
(front is opposite side of joining of rows and back  is side of joining rows). Figure out where you want your button and place marker. I placed mine in the 7th row from top. I used a large button.  My yarn needle does not go through.  I have an upholstery needle and it worked well.  With yarn thread needle with a long piece of yarn.  Leave a tail long enough to tie knots and weave ends through purse a few inches.  I sew button on in a cross fashion.  Doing so twice.  I tie the two ends of yarn together and run each end through work.. in one direction and then the other to secure.  Cut yarn.

Edging: (sc goes in each stitch, the chain in between gives it a slight ruffle) sc, ch 2 around until 2 stitch before your first marker (this is side your button goes on); ss in this stitch and next 4 stitches (5 ss in all) continue sc, 2 ch around, (to form button loop) ss in marked stitch and ch appropriate amount to reach around button (I chained 25); join with ss in same stitch as last ss; continue sc, 2 ch around, join with ss; fasten off; weave in ends.
Strap: chain 4; in back hump hdc across (3 hdc); ch 1 loosely (does not count as st); turn, hdc across. Repeat until desired length.  I did about 29" 

Mark center sides and center straps on inside (pins can help hold in place) and sew in place.


blogsig

A Few Blessings

In my last post A Long Time Passing I said I would tell you about some of my blessings.  It has been a while since that post.  Here are a few:

I had the feeding tube taken out last October.  Big happy dance!!! My leftover supplies went to Easter Seals and benefitted a 6 year boy and a lady.  Yeah!

I have lost about 5 pounds since then and am holding my weight at this time.

I have stayed sane through crocheting.  My next post will be about that.

I have 4 beautiful grandchildren.  Joy of my life.  I call them Darlings. 


   Carly, Jaime and Mary.. Nick is missing :(


blogsig

Monday, August 17, 2015

A Long Time Passing

I have missed blogging.  I have not been well and have been going through a lot and am still going through a lot. I have been on the internet mostly through my ipad.  I would have to start a whole new blog to use it for composing post.

I composed this on the ipad and sent it to another computer via email.  Still takes time, but it worked. I will try to do better at writing and also at reading.  I see some of my friends have left their blogs, but hopefully some of you are still around.

I will give brief synopsis (yes, it is long, but believe me it is the brief version) of bad health. I had a paraesophageal hernia (hiatal) since late 1990s. In 2001 I had nissen fundoplication surgery to repair it done laparoscopically. It almost immediately started failing. So more years of acid reflux from it. In 2007 the hernia pulled my stomach into my chest. I had another nissen fundoplication repair done laparoscopically. This time the surgeon used a mesh. I still had symptoms after surgery plus stomach pain. My complaints to the surgeon were ignored. Basically "I'm God... the surgery is not a failure" is what he said and said my symptoms were because I was fat. He did not believe my gastroenterologist that the hernia had returned. Test showed it had returned and an endoscopy my gastroenterologist did also showed the hernia. I broke down and let the surgeon do another endoscopy. He claimed no sign of the hernia. I did not go back to him.

I kept having check-ups and just about yearly endoscopies with my gastroenterologist. He told me in 2012 that I needed to have surgery. I had lost 30 lbs. Yes, I needed to lose it, but it was within about 2 months. I had nausea and vomiting. He said he thought the pain and nausea were from the mesh. I went to a different surgeon. Even though my gastroenterologist had done a lot of test the surgeon wanted another one. At my return visit to the surgeon he said he would not do the surgery. Of course our question: why not? He said because of the mesh. He said no surgeon in this area was capable of doing the surgery... he also said some will tell you that they can. He recommended the Mayo Clinic, Jacksonville Florida.

Surgery 1 at Mayo Clinic 03 Oct 2013 

I have Tricare Prime insurance and they require referrals and authorizations. Takes forever sometimes. Finally got it and saw a surgeon at the Mayo Clinic in Jacksonville Florida. By this time I had lost 40 pounds. I also had to see a gastroenterologist there too. He had me try a compounded drug for a few weeks thinking my problems might be caused by gastroparesis (slow empyting of stomach). The drug was of no help... knew it would not be. Finally surgery approved and still had to wait a couple of months. I was encouraged to keep my weight up. I somehow managed to.

We made plans to stay in the campground at Mayport Naval Station from day before surgery until I was released by doctor to travel home.

 The mesh made a mess of things. The surgeon and team unwrapped the nissen and they had to remove part of the fundus because of the damage the mesh did. So another wrap was out the question. The surgeon anchored the hernia to the diaphragm with a safe bio mesh. All done laparoscopically.

Shortly after surgery I started having symptoms again. In April I had a barium swallow test as the surgeon ordered. The radiology doctor called my husband in and told us both... showing us a picture... that I needed surgery and the sooner the better. My stomach had pulled up into my chest.

Surgery 2 at Mayo Clinic 23 Sept 2014 

Yes, another long wait for surgery. The surgeon that did the previous surgery had left the Mayo Clinic. So had to see a different surgeon there. Insurance denied surgery. We had to do an appeal. Tricare does not have doctors for surgeons to talk to so it was handed to another company. Finally approved.

Plan was explained. A Roux-en-Y (gastric bypass) was to be done laparoscopically. We made plans to stay in the campground at Mayport Naval Station from day before surgery until I was released by doctor to travel home.

The surgery was done. My diaphragm was just about shredded and they managed to anchor the hernia somewhere. On day three after surgery, I think it was, my esophagus decided to shorten. It caused a kink which in turn caused a small leak. They put in a drain. That really hurt! I had it in for about three months. In addition to the kink part of my small intestines pulled up into my chest. I got an infection from the leak and also ecoli in bladder (which probably came from whoever put catheter in before surgery).

I don't know much of what happened in that week. One resident came in told Frank and me that I was septic... be prepared. I think that guy got a talking to when the surgeon found out. The surgeon had already explained the infections... it took a couple of days to figure out the bacterias and I think they did 10 different antibiotics making sure they had it covered until they found out which antibiotic would work. I stayed in hospital 20 days and still looked like death warmed over when I left. The doctor wanted us to stay in area which we had planned on anyway. I think he let us leave the hospital so we could get some rest. In about a month I was strong enough to go home.

Surgery 3 at Mayo Clinic 18 May 2015 

We knew I would have to have surgery again. I have been on the feeding tube since day 3 of last surgery. I was able to eat again and was down to one can of formula in March. We had our granddaughter that day and I just could not get comfortable. My whole rib cage hurt. I finally told Frank I needed to go to ER. He called his sister to take Carly to her parents. We spent over 10 hours there and did not see a doctor until that last hour. They gave me pain medicine in IV and I had blood work and a CT scan. The CT scan showed more of my intestines pulled up into my chest and my left lung pressed against my ribs. I got a script for pain medication and went home very drugged and tired.

I saw a PA at my gastroenterologist's office a couple of days or so later. She talked to my gastroenterologist and he said I needed to go back to Mayo clinic as soon as possible. I got an appointment... thankfully with same surgeon. None of what happened was his fault. It was just how my body reacted and no way could he predict that.

There were no openings until May... so more waiting and praying that I did not have an emergency which would require being airlifted to the Mayo Clinic.

This surgery had to be "open" and there had to be a thoracic surgeon to help. He would take care of the lung part. The thoracic surgeon told me what all he had to do... crack two ribs and muscles cut.. and I said it sounded painful. He said it will be. You will be in a lot of pain for months. Yep, scared me, but I had no choice but to have surgery.

I woke up with two chest tubes. There was fluid in the lung and thoracic cavity. I still have a small amount in left lung. I did okay the week I was in hospital. Tubes were removed. I got out on Memorial Day.

The next Tuesday I started dry heaving. Very late... after midnight I think... I awakened Frank. I was dry heaving and the Zofran was not helping. We spent only about four hours at the ER. They got the nausea under control.

About six Wednesday evening I told Frank we need to go back to the ER... the dry heaving was back and I could not control it with Zofran. We waited forever in the ER waiting room. I felt sorry for the people that heard me. i was given Zofran and Phenagran by IV again. It was under control again except when I had to get up and go to bathroom. The nurse that was about to have me sign the release papers saw me dry heaving again. They did a CT scan and my surgeon had me admitted again.

The CT scan showed everything was in place, but there was edema. Swelling of esophagus and diaphragm area. It happens in only about one percent of patients. They tried steroids until the next Monday and inserted a tube in my right nostril to drain mucus. The steroids did not get the swelling down. An endoscopy and dilation of my esophagus on Tuesday was done and it helped a little, but not enough. They did another on Thursday and I was much better. I was released from hospital a couple of days later.

I had another endoscopy with dilation of my esophagus in June and another in July. My esophagus is now in the lower average size range.

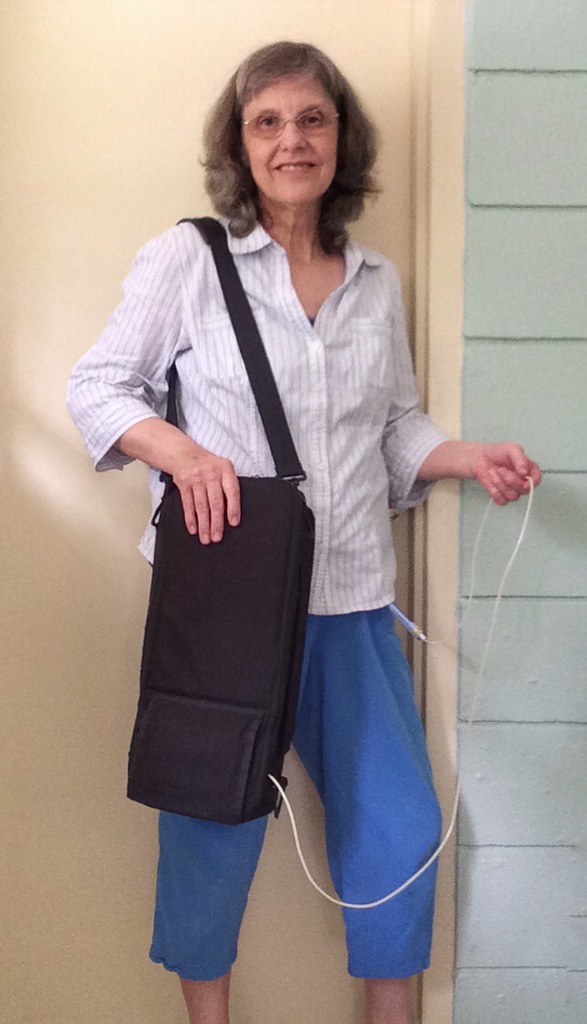
I am doing well. I still am having to chop my food up fine and cannot eat much at a time. I am slowly reducing amount of nutrition I get from feeding tube. At present I have three cans of nutrition at night. That gives me from about 9:30 am until 7:30 pm with having to carry the feed bag around. Hopefully in a couple of months I will do well enough the feeding tube can be removed.

My rib cage is still giving me a lot of pain. I have reduced Oxycodone down to two doses most days. Having to sneeze is awful. I scream every time with pain. One of these days the rib cage pain will be gone.

Next post I will tell you of the blessings in my life.

image


UPDATE 18 MAY 2016

It has been a year since my last surgery and 7 months since feeding tube removed. I have lost between 6-8 lbs in that time period. Sometimes it is very difficult to eat and my weight drops. After this last drop I managed to get the we...ight back up.. brownies will do that. I have to eat too much junk food to keep my weight up. Brownies probably have more nutrition than a lot of other foods 😃 I still eat something every two to three hours during the day. Tender cooked meats, well-cooked veggies or fruit except an occasional raw banana. I need to chew my food well. I have tmj and all this chewing does not help that problem. Some foods are difficult to swallow like bread. I can usually get a sandwich down, but sometimes I cannot. The same with biscuits. If meat is dry it is difficult to swallow. I saw my gastroenterologist, Dr Knepp, last Friday and he said it may never get better. He did not want to do any test right now. Just see how I am in a few months. Which sounded very reasonable to us.

I still tire quickly. I can sometimes manage two short-mile walks in a day. Most days it is just one. I do get up and walk around the inside of the house and around the yard. I can do a load or two of laundry. If there are not many dishes I can do them. Not sure why it is more painful to do dishes than laundry. I straighten the bed covers and I can run the cordless sweeper for a minute or two.
Doing anything is painful still... even walking. The pain is mostly in my left ribcage. It is in what is called the intercostal muscles. These are the muscle that cause the chest to rise and fall when you breathe. If you have ever had a bad cough and your rib cage hurt when you coughed you know which area I am speaking of. I am seeing Dr Matthews now for the pain. He has helped a small bit with injections. The intercostal muscles/nerves have not responded to them. In a few weeks he will do nerve blocks with phenol. Hopefully it will quell the pain. At one time I was taking just one oxycodone, but had to increase the dosage. Trying to do more creates more pain... doing less creates more pain 😟 A conundrum.

Mentally.... there are days of depression or minutes of it to deal with. I try not to let it get a stranglehold on me. I crochet, play Words With Friends, and play a jigsaw app to keep my sanity.
Spiritually.... When I awaken in the mornings I praise God for giving me another day. I do falter and ask: why me? why us? Frank has been right by my side seeing that I get the best care and doing what is necessary to get me well. I thank Father for guiding me to a loving companion
 
UPDATE MAY 2017

I had to stop my mile walks. My feet are hurting.  The neuromas I had removed in 2012 are back and I hurt my left foot back in February.  I caught my little toe on one of the kitchen bar stools.  It still has not healed. They say no fracture and probably a neuroma has formed.  Injections have not helped.  Will have to have surgery before much longer.

I am have a very hard time swallowing and have lost a few pounds.  My local GI doctor does not feel comfortable doing an endoscopy because of all my problems.  I have had severe diverticulitis and he will do a colonoscopy in August.

UPDATE JULY 2017

I  went to Mayo Clinic and saw Dr Frances and her NP, Lois.  I liked them and them explained things well.  The motility of my esophagus is not good at all. I had an endoscopy and was diagnosed with Barrett's Esophagus... precancerous cells.  My med was increased to twice a day.  They dilated my esophagus to 17 mm.  I am to come back in two years for another visit, but we all expect I will be back in a few months.  It is still difficult to swallow some things... especially pills.


 blogsig

Thursday, November 1, 2012

Reed Bingham State Park

 I'm linking this post to Friday Fences.  Two fence pictures... over the river and through the woods :-)  I am also linking to Skywatch Friday.  Please visit this two sites and enjoy wonderful photos.

Last month we went to Reed Bingham State Park which is near Adel Georgia and not far from Valdosta where our son and his family live.

The Little River runs by part of the walking trail.  We took our fishing gear down to a pier and played with the tiny fish for a bit.  Bait snatchers is what they were.

All the photos should open in a new window in Flickr.

Reed Bingham State Park strives to preserve the wildlife that lives within its boundaries.  This is a nesting box, I think for ducks.   There are also turkey vultures that nest along the river and a pair of eagles.  I have not seen the eagles yet. 

Reed Bingham State Park

It was quiet and peaceful here.  I just wanted to cloud watch.

Reed Bingham State Park

 With Halloween looming  the moss looked spooky, but beautiful.

Reed Bingham State Park

 It was beautiful along the boardwalk too.  
There were many orchard spider webs amongst the rails.

Reed Bingham State Park

But unfortunately the webs do not show in the photos.

Reed Bingham State Park

 Fungi was abundant.
I'm not sure if that is a good thing or not.  
It is pretty though.

Reed Bingham State Park

 These leaves were lying on the rail... just looking pretty to me.

Reed Bingham State Park

The park grows long-leaf pine trees too.  
At one time they were abundant in Georgia.  
They were severely harvested and almost totally lost for all time. 


 Here is a planted stand about halfway 
between the walking trails and the campground.  
It took the trees many years to get this tall.


This fungi was in the campground area.  
I have never seen any quite like this before.  


I can almost see a face within it :-)  
Where the blue blob is in the photo on the right 
just above my name is where our campsite was.

Reed Bingham State Park

blogsig

Tuesday, October 30, 2012

Great Grandma Banana Pudding Recipe

My great-grandma was born Clora Aurora Porter in 24 December 1872. She married John Wesley Hogan 04 April 1888. They were the parents of eleven daughters... all but one made it to adulthood. Grandma Hogan died 30 June 1946.

G-Grandma Hogan in her younger days


 Here is G-Grandma Hogan and G-Granddaddy Hogan on their 50th wedding anniversary.


I did not think about taking a photo until the pudding was almost all eaten.  So it isn't as pretty like it was when first made.


I do not know what the origin is of this recipe. Bananas came to the USA in the late 1800s.  Southern ladies often made trifles with them by layering the bananas with lady fingers or sponge cake and pudding.  In the early 1900s Nabisco started putting a banana pudding recipe on their box. 

This recipe is sweeter and richer tasting than Nilla Wafer's recipe and it is made with water.  Yep, you read correctly water.  Milk can be substituted, but I personally think it taste better made with water.   I may have changed something in the recipe, if so it probably was the addition of vanilla.  I'm not sure where my original copy is hiding.


Here is the recipe: Great Grandma Hogan's 'Naner Pudding.


blogsig

Friday, October 26, 2012

Gender Party and Camping Out in the RV

We took a short vacation to Reed Bingham State Park and visited with our son and his family.

One day I got to go to the doctor with our son and daughter-in-law and watch as an ultrasound was done.  I had never seen one take place in person before... it was awesome watching the heart beat and the legs and arms flail about.

That evening was a Gender Party.  We are very dumb about what we see in the ultrasound, but pretty sure my feelings and Frank's were right-on... the feelings had been there since we knew a baby was on its way and we were correct :)


Whoo


The hostess made two cakes. One had a blue-colored layer and the other had a pink-colored layer. The one sliced was the gender of the baby. The hostess made the layers ahead of time and froze them. On the day the gender of the baby was revealed she decorated the cakes. The tec after the ultrasound wrote the gender of the baby down and put it in an envelope... so the couple did not know the gender until the party. The hostess was waiting in the parking lot anxiously awaiting the envelope.


It is a girl!!!  Her name will be Carly Zaroga.  I am honored that she shares part of my name.  She is due the first part of March.  We are so excited!


Do you see the dill pickles wrapped in cream cheese and ham by the bag with the owl?  They were good.  I need to ask Laura how she made them.

Here is the happy couple, Dave and Laura.  The boy in the chair is the hostess's son, Cody.

The Happy Couple


The next Friday Mary and her friend Haley (hostess's daughter) came and spent the night with us in the travel trailer.    We did a haunted hayride and the haunted house.  The hayride was scary, but not as scary as the haunted house.   Frank and I were not too crazy about being that close to the strobe lights in the haunted house.  I think the girls weren't either.  They shivered just about the whole time in the haunted house.  Fortunately, no nightmares that night.

Saturday morning was jamb-packed with bike riding, pumpkin carving, putt putt and the playground.  Laura and Dave came out and we had a great lunch.  They took the girls back with them... whew!... one can only take so much of an almost 8 year old and an 8 1/2 year old.  After church Sunday they returned and brought us a nice lunch from Publix.  The girls rode their bikes and played at the playground.

Monday we did nothing... just needed to rest.  Well we did small walks around the campground and read and most importantly napped. 

Tuesday we took a walk to the river and tried our hand at fishing... nothing but minnows stealing worms.  I took a few pictures and maybe soon I will have time to look at them and post a few. 

Wednesday we cam home and I started on the mounds of laundry... still working on that.

We went to the doctor on Thursday.  My back is giving me a bit of trouble.  Hopefully it is just fussing a bit.  The doctor said we are treating it as inflammation right now... which meant a Toradol injection.  Hopefully within a few days my back will feel better.

We really did have a great time... we did not miss the internet much ;)

  blogsig

Friday, October 12, 2012

AUTUMN IS IN THE AIR

A slight bit of color has arrived around us in SW Georgia.  The grapevines are turning.  Some of the leaves from the dogwood trees have turned brown and fallen.. the same with the pecan trees.  The birds are few in numbers right now.  Even though the House Finches are here year-round I think some migrate.  In a few weeks the chipping sparrows will arrive and before you know it spring will be here and a family will occupy this box or another one.. this one looks a bit need of repair or replacing. (when clicked on the photos will open in a new window in Flickr to a slightly larger photo)


Oh my.... this is all the decorating I'm doing for Autumn.  She is all ready to give you a Welcome Hug.

Welcome

Traveling is in the air for me when the weather becomes cooler.  We do not camp in a tent any more.  We hook up the travel trailer to the truck and go. I'm so ready to travel... even if it is nearby. 
 blogsig 

Saturday, September 22, 2012

Gecko and Flowers


This little critter has given me a startle a few times... it probably has a brother or sister in the house too.  It is a Mediterranean Gecko.  Not the greatest picture, but it is only about 2" long (a baby) and I cannot get down to its level very well right now.  You can almost see through its feet.

Pictures should open in a new window at Flickr.


Mediterranean Gecko
  
Description: 4 - 5 in (10 - 13 cm). Unlike any native lizard, geckos have sticky toe pads, vertical pupils, and their large eyes lack eyelids. Indo-pacific geckos are generally light gray or almost white in color but may have some darker mottling. This species is most easily distinguished from the similar indo-pacific gecko by its bumpy or warty skin.
Prey: Geckos eat a wide variety of insects, spiders, and other invertebrates.
Reproduction: Female Mediterranean geckos lay several clutches of two eggs throughout the summer. Instances of communal nesting have been reported, with several females laying their eggs together under bark, in crevices, or in moist soil.
Abundance: The Mediterranean gecko is firmly established in Florida and is spreading northward. It is almost always associated with human development and is an abundant species in suburban and urban areas.
Notes: This species' adaptability has made it a very successful invader. It is unknown what impact the introduction of this and other species has and will have on native wildlife. Unlike most lizards, geckos are capable of vocalizing, often making squeaking or barking noises in territorial disputes or to deter a predator.

More info here: Mediterranean Gecko

The Angel Trumpet did not produce as many blossoms this year.... not sure what we did differently.  The blooms we did have were pretty.


I saw these along my walk the other day.  The red flower is a type of morning glory too.

Morning Glories
 
 I had not seen these pretty little red flowers before last year.  They are called Turks Cap.  I did enhance the color slightly on this photo.  The flower on the left has fallen over and is beginning to wilt.  

Turks Cap 

Another Turks Cap.  I still need more practice.  I cannot seem to get everything in the focus I want.

Turks Cap

Autumn is here.... at least it should feel like it next week.  I do love the change in lighting.  The change of flora.  The change of aromas.  The coolness in the morning air.  A time I can enjoy with windows up or enjoy the patio with a cup of coffee in one hand and a good book in the other hand.
blogsig

Monday, September 17, 2012

Pinned It, Made It! Monday: Pineapple Casserole

I am joining Tammy "Country Girl at Home"


Years ago I had a bit of a pineapple casserole that tasted mighty fine.  I cannot remember who made it.  

I decided to try Paula Deen's recipe for Pineapple Casserole.  It looked about like all the others I found. 


So I gathered my ingredients for half the recipe.. not pictured is the flour that I forgot to set out. I soon remembered.  I used Splenda instead of sugar.... I read many recipes that substituted.


I buttered a 11"x7" dish and thoroughly mixed the flour, cheese and pineapple together.


I mixed the crumbs together.... which I used just half a sleeve and it equaled over a half of a cup.... with the butter and pineapple juice.  It was right soggy looking and you can barely tell I spread it on top.


My version does not look as pretty as Paula's :-(


 sniff... sniff... failure

I might should have used a deeper dish.  I could have let the top brown more, but the bottom was getting too brown. 

It tasted okay, but a little on the greasy side and not near as good as the one I tasted at the family gathering. I do not think the Splenda had to do much with the results.  I think it was the soggy, greasy crackers.  

I think I'm going to ask around and see if I can find out who made the one I tasted.

Paula's Recipe... maybe you will have better luck than I did.

Pineapple Casserole

Ingredients

1 cup sugar
6 tablespoons all-purpose flour
2 cups grated sharp cheddar
2 (20-ounce) cans pineapple chunks, drained, and 6 tablespoons pineapple juice reserved
1 cup cracker crumbs (recommended: Ritz)
8 tablespoons (1 stick) butter, melted, plus extra for greasing pan

Directions

Preheat the oven to 350 degrees F. 
Grease a medium-size casserole dish with butter. 
In a large bowl, stir together the sugar and flour. Gradually stir in the cheese. Add the drained pineapple chunks, and stir until ingredients are well combined. Pour the mixture into the prepared casserole dish. 
In another medium bowl, combine the cracker crumbs, melted butter, and reserved pineapple juice, stirring with a rubber spatula until evenly blended. Spread crumb mixture on top of pineapple mixture. Bake for 25 to 30 minutes, or until golden brown.

Paula is from my hometown and I love her even though I do not have success with all her recipes.

  blogsig